How To: get the maximum from LeetPlug
Dear LeetPlug user, you can find below the instruction about how to install and activate your LeetPlug extension
Extension installation
The extension is officially available on the
Chrome Web Store or on the
Firefox Web Store. Just search for LeetPlug extension and install it.
Extension configuration
After the installation, the extension will be available in your browser. You can access to it with the button near the URL field.

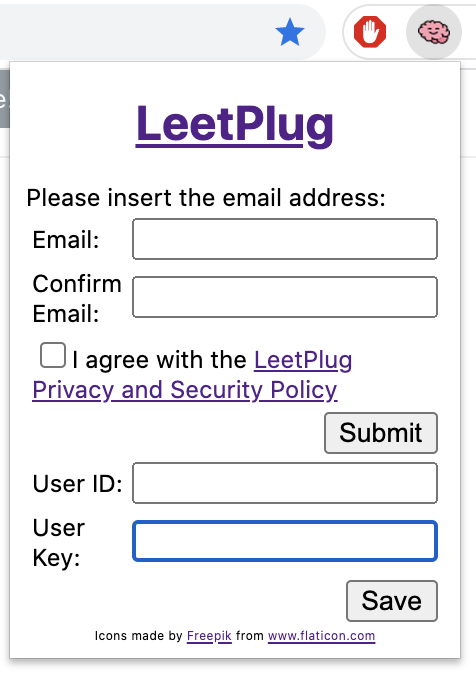
To open the LeetPlug options, click on the extension icon. A popup similar to the following will appear:

Now you need to insert your email and press the
Submit button. An email should be sent to the specified email address with the credentials needed to complete the configuration.
Please copy and paste the User Id and the User Key received by email inside the extension popup and you will be ready to use it at full power!
NOTE: a restart of the Chrome browser could be necessary to allow the proper load of the configuration.
Extension usage
Now you should be able to open any problem inside the
https://leetcode.com/problemset/all/ problem set and see the extension in action.
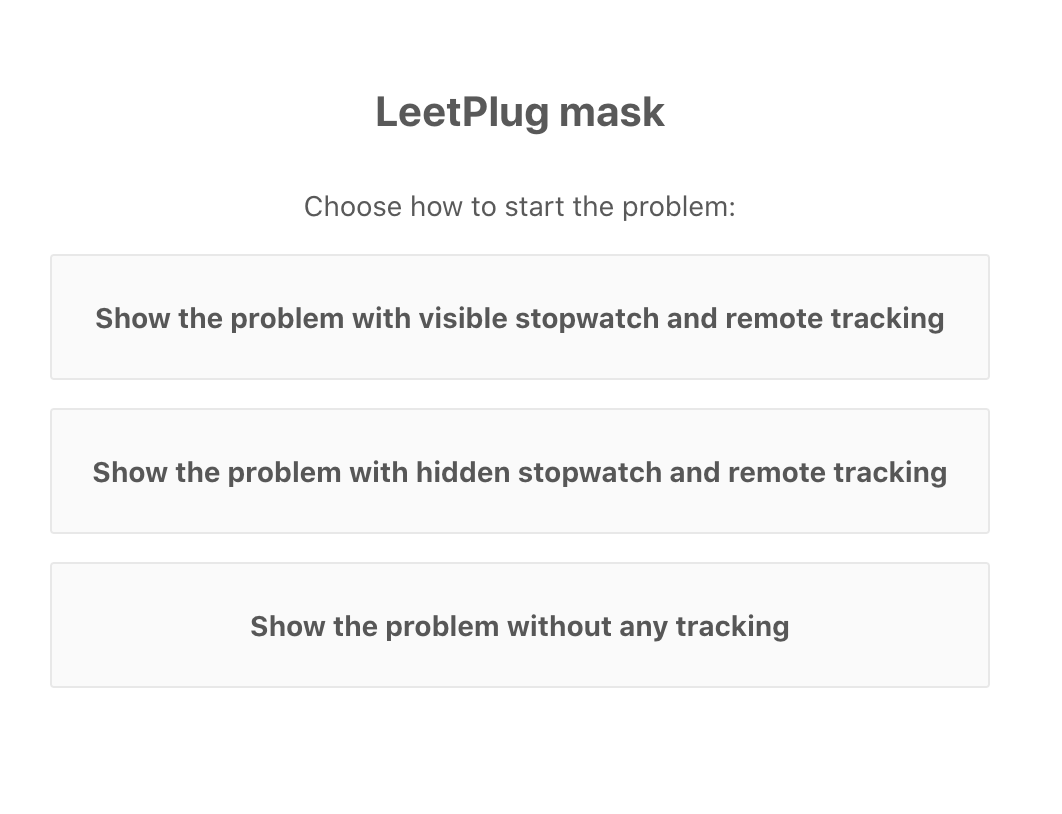
The problem description is hidden and three buttons are displayed, allowing to start the exercise with three modalities:
- With a visible running stopwatch in the lower right corner and remote tracking of the submission results
- With a hidden running stopwatch and remote tracking of the submission results
- Without any LeetPlug feature: no stopwatch nor submission tracking

When the selected problem already has some custom code in the solution panel and the user select to proceed with remote tracking, the extension propose to reset the current code to start from a clean situation. It uses the LeetCode event, triggering the alert window:

If you confirm, the current code is wiped out and you need to click again on the LeetPlug selection button to start the exercise.
When a problem is started with the time tracking option, the stopwatch is started. The system track all the submissions, including the failed ones, until the first acceped. All the records are sent to the remote server for later visualisation.
Results page
All the problems which has been started, rejected or successfully completed are tracked and set to the remote server. You can access to it throught this site, insertig your User Id in the following field:
An example of collected data is:

The result table shows the data grouped by problem. Some of the main use cases are:
- Sort by Last Accepted to refresh the problems which you executed too long ago
- Sort by Last Finish Time to improve your speed on critical problems
- Sort by Rejected to refresh the problems where you had a lot of rejections before finding the proper solution
Enjoy
I hope that this project will help you to improve and land in your dream job! We are all searching for something, keep running!
 HowTo
GitHub
Privacy Policy
Contacts
Donate
"Luck Is What Happens When Preparation Meets Opportunity" [Seneca]
 HowTo
GitHub
Privacy Policy
Contacts
Donate
"Luck Is What Happens When Preparation Meets Opportunity" [Seneca]


